

I wish I was one of those super organized note takers with files of notebooks with all of my drawings (I’m looking at you Aspen), but I’m not. I have piles of loose papers, of all shapes and sizes, with scribbles of grocery lists, doodles and chair designs. The other day, I was unpacking some boxes and found this scrap.

Don’t worry if it looks like cryptic gibberish. The funny part is, I knew immediately what it was about, weird disembodied eyeballs and all, but I couldn’t remember how it worked.
Early in my chairmaking days, I was making birdcage chairs. They have curved posts and I needed to build bending forms to make them. The problem was that the only way I knew how to draft the chair was from the front, side and top (plan) views. But these view don’t show the actual curve of the part as it would relate to the bending form. So I did a lot of head scratching and figured a way to derive the curve from the info in the front, side and plan view. It took me longer than I care to admit to remember how to do this from the drawing I found. If it doesn’t make sense to you, don’t worry, it’s actually pretty simple, and I did another drawing to show how it works.
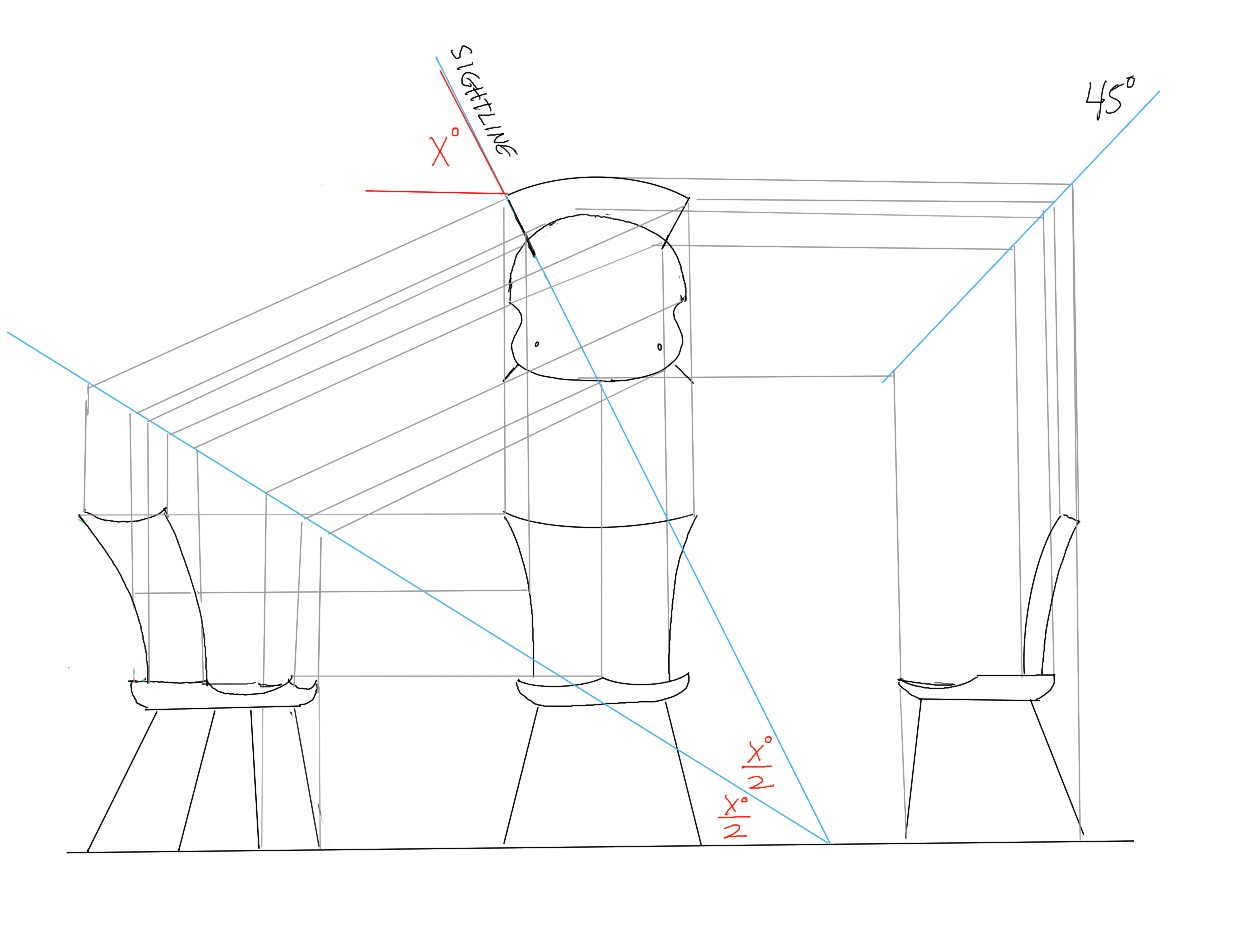
You might recognize the front, side and plan views in the center and right side of the drawing with the 45 degree refraction line. If you follow the grey lines, you can see how the information relates on the three images. The problem I faced was how to rotate the chair out of those three views so I could see the actual curve. The key to this is the sight line of the post on the plan view. Think of the grey lines perpendicular to the post sight line as as showing the view point, so it’s like you are standing there looking directly at the side of the curve. To shift the information down to the level of the front and side views, I used a refraction line (1/2 the angle of the sight line) to redirect the info straight down. If you follow the grey lines from one drawing to another, you can see how the points relate to plot out the rotated image on the left side of the drawing. I’m excited to share this, largely because it means I’ll never have to try to remember how to do it again from some faded scribbles.
Drawing this brings to mind a story Curtis Buchanan told me. I’ll do my best to paraphrase the story, but you should get Curtis to tell it sometime, he’s a much better story teller than me. He was attending a talk by another woodworker who described a method he used for lay out. Someone in the audience pointed out that it could be done faster. The speaker acknowledged the comment and moved on. Later, Curtis asked him about his response to the comment, sensing that the speaker had held something back. He told Curtis, “Why would I do something in 15 minutes when I enjoy doing it for an hour”.
I think about that a lot. It’s important to get the job done, after all there are bills to pay, but I have yet to meet a woodworker who doesn’t set aside certain tasks or processes for the sheer joy of doing them for however long they take. I don’t know if I used this drafting technique much, usually some sort of full scale mockup does the trick. And yes, I know there are computer programs that can spin a rendering to any angle and point of view, but when I first did this it was probably 2002 and I barely had an email address, plus, I do love drawing chairs.
[Insert mind-blowing image here] Pete, that's brilliant -- and delightful. I have no idea how to work with computer drafting programs, but I can wrap my head around this, and I can see how satisfying it would be to make that fourth image emerge on paper. Thanks!
Thanks, I enjoyed this post. I have no motivation (yet) to use a computer to design things - use one too much at work. Was fun to contemplate the image and angles and see again how sight lines are so important to chair making